Get in Touch with SINOFUDE Company

Hard Biscuit Line Guide: Control the Process from Dough to Packaging

A hard biscuit line becomes more manageable when each transfer is considered a decision point rather than the next machine in the sequence. Because cookies and hard biscuits may share some machinery in biscuit manufacturing, this manual focuses on evidence from sheeted products rather than catalog tags. It follows the observable state of the product from dough to packaging handoff, allowing a team to capture evidence before making a process change. It is an educational process-control guide; configured equipment, model, capacity, utility, quotation and RFQ decisions remain outside its scope.
From Dough to Pack-Ready: The Eight Control Handoffs
A stable hard biscuit process is built by releasing one observed product state to the next, from dough acceptance to packaging state readiness. The useful question at every handoff isn’t “is the machine running?”, but “what evidence indicates this material is prepared for the next operation?”
The 6-State Biscuit Control Framework is an editorial framework, not an industry standard. It keeps six connected evidence fields—material and lot, dough state, sheet and cut evidence, oven evidence, cooling and release evidence, and interventions—alongside the eight handoffs. This connection helps trace a later defect to conditions rather than to memory. For other members of the bakery family, see the biscuit production line overview.
| Handoff category | Product-state evidence | Question before release |
|---|---|---|
| 1. Dough acceptance | Lot context, cohesion, extensibility and rest status | Does the dough behave as this recipe and batch are expected to behave? |
| 2. Feed to sheeting | Transfer continuity and visible consistency | Is the feed stable enough to form a continuous sheet? |
| 3. Gauge reduction | Edges, holes, recoil, sticking and thickness variation | Can the sheet take the next reduction without visible stress? |
| 4. Cutting and docking | Definition, release, registration and scrap-web or tied-sheet/edge-trim continuity | Do pieces and trim tell the same story? |
| 5. Oven entry and exit | Loading, zone observations and finished structure | Did the product travel through the intended thermal sequence? |
| 6. Cooling release | Product condition, room context and measurement method | Is the biscuit physically stable enough for the next handling step? |
| 7. Inspection and stacking | Breakage, checking, color and transfer observations | Is the observed defect pattern understood, not just counted? |
| 8. Packaging handoff | Physical pack-readiness and recorded exceptions | Is the product ready for wrapping under the site’s separate hygienic controls? |
Source note: the sheet, gauge, relax, cut, trim route is based on a literature review of biscuit-forming processes; the eight handoffs are this guide’s diagnostic synthesis.
The key takeaway is that capturing the state of the material at a handoff, the observation method, and the question at release as a unit makes that handoff controllable.
Why Hard Biscuits Are Sheeted and Cut
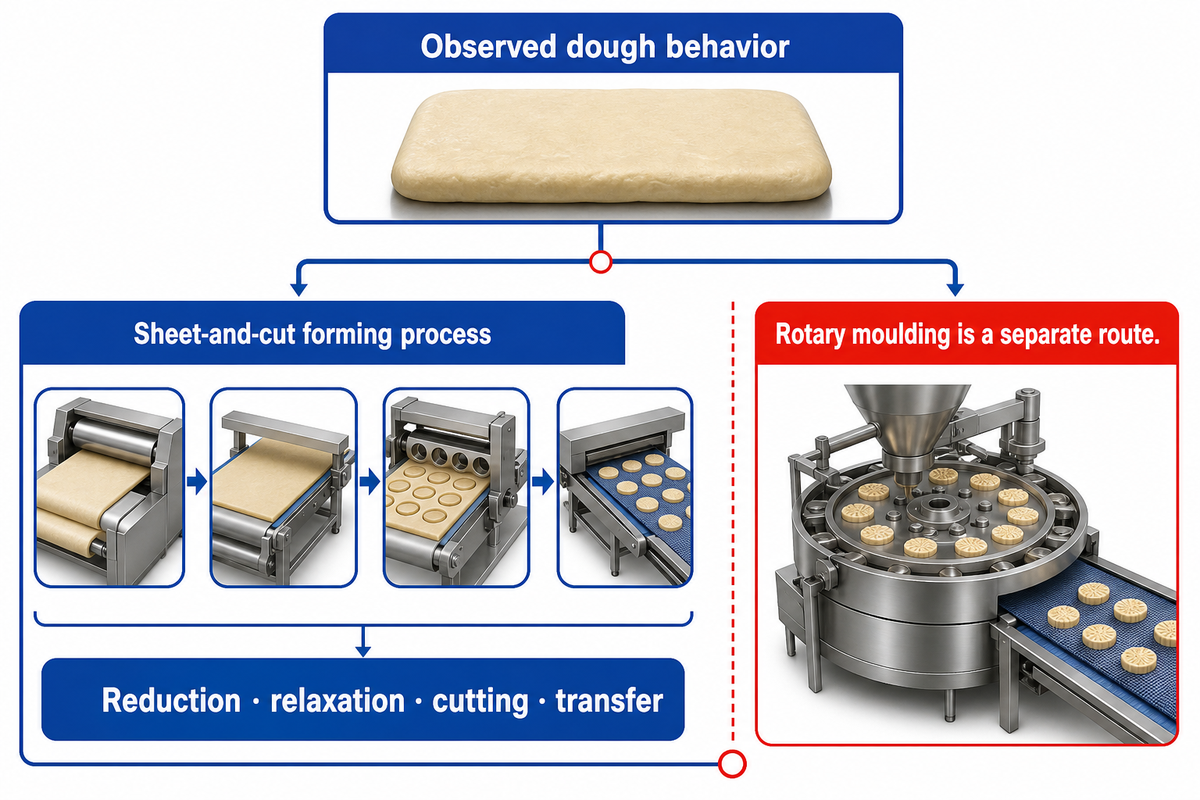
Reviewed hard and semi-sweet biscuit routes are defined through dough behavior and a sheet-and-cut forming process rather than by product labeling. Reviewed forming literature distinguishes continuous sheeting and cutting from rotary moulding used for softer or shorter dough families.
That distinction is important because a sheet must survive reduction, relaxation, cutting and transfer. A dough that looks acceptable in a bowl may still show recoil, edge tearing or poor release when it becomes a moving sheet. Conversely, there’s no guarantee that a biscuit product labeled ‘hard’ would require the use of a continuous sheeting and cutting process in all factories.
Route boundary: use the forming mechanism to frame the process discussion. Do not use this guide to infer a universal line design, a commercial configuration or a preferred model. If the forming route itself is unresolved, the hard biscuit forming route checker can organize the evidence to collect.
The useful comparison in process is sheetability versus the forming response required by the other routes. A soft biscuit production line may use molding behavior that does not belong in a hard-biscuit sheeting rule. Rotary cutting, docking and trim return belong to the sheeted process narrative; rotary moulding should not be treated as a synonym simply because both make biscuit pieces.
The key insight is that “Hard biscuit” is a starting label and the process route is established by observed dough behavior and forming mechanism.
Dough Preparation: Observe the State, Not Just the Clock
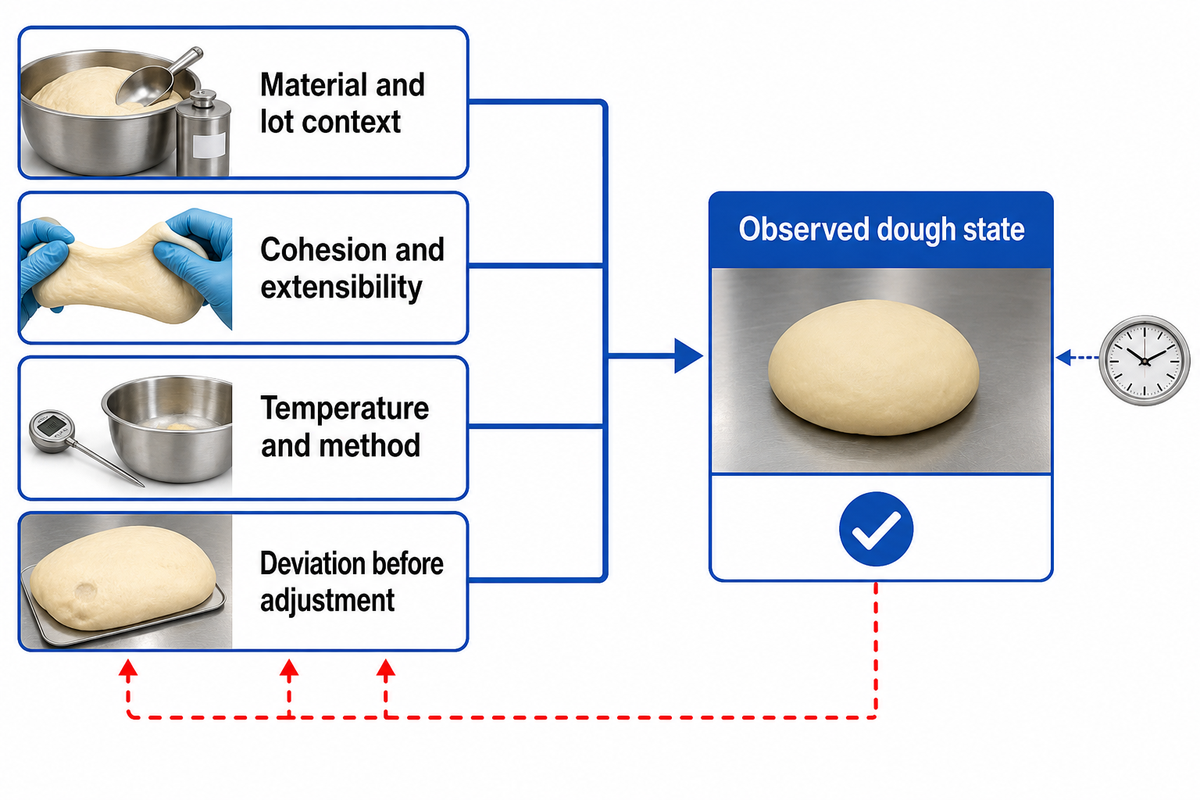
Dough should be released to the sheeter on observed cohesion, extensibility, temperature, rest status and batch context, not because a copied mixing time has elapsed. One study about semi-sweet biscuit dough related formulation-dependent rheology to finished texture. This supports keeping the formulation visible in the batch, and doesn’t prove the existence of a universal mixing time.
Record ingredient and lot identities, dough mixing sequence, visible uniformity, dough response during handling, measured dough temperature, and the actual rest event. “Mixed dough” is not enough detail if the record omits when the operation ended, what changed during rest, and which batch it describes.
- Describe the material and lot context before interpreting a dough change.
- Describe cohesion and extensibility in the same terms as the operating team.
- Temperature and time must always be captured as they relate to the measurement method; they can’t be captured as two disassociated values.
- Note deviations prior to adjusting mixing, water, or downstream settings.
SINOFUDE can appraise process evidence for a project, but the company brand description doesn’t represent a universal mixing result or dough release criterion. The production team needs recipe-specific trials and validated controls.
The central point: The clock is an input to a dough record, but a release decision relies on the observed dough state for that batch.
Sheeting Without Stress: What to Observe Before Each Gauge Reduction
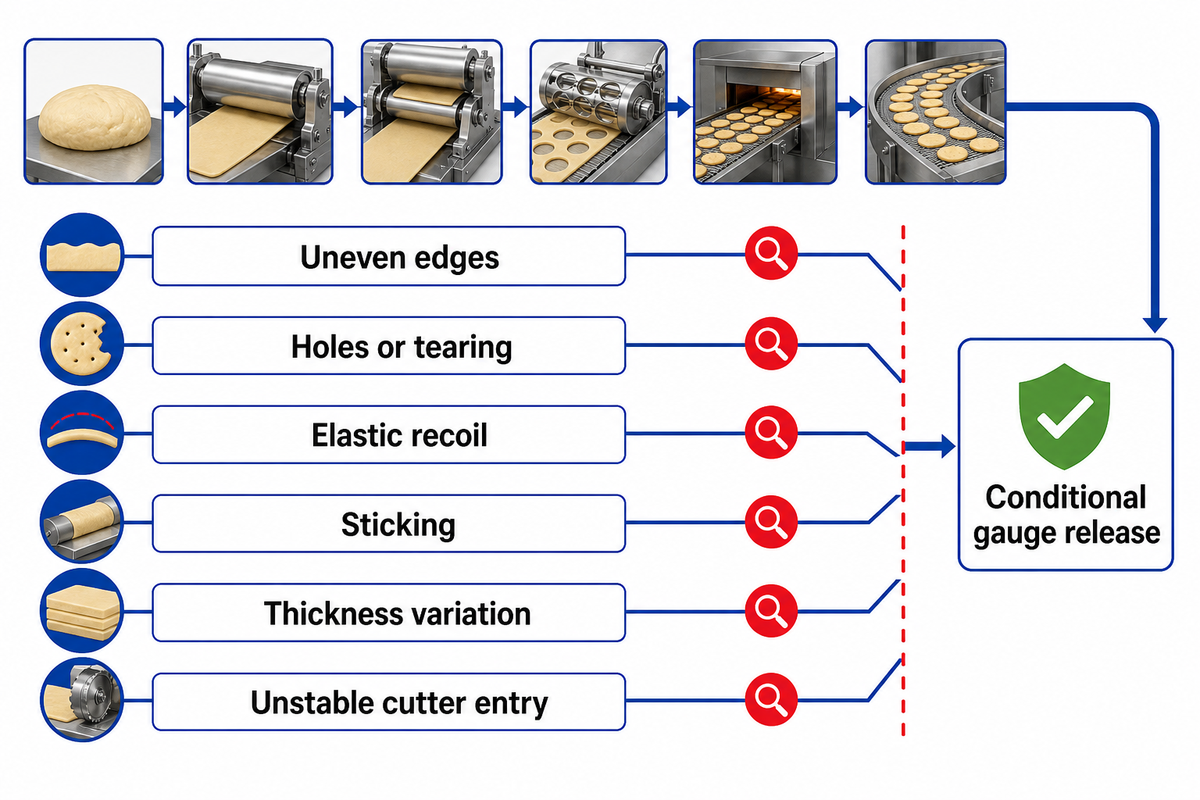
Prior to each gauge reduction, confirm that the sheet is tracking, holding edges and transferring without obvious stress signals. Progressive reduction and relaxation are supported as useful process concepts, but no reviewed source makes one roll-gap ratio universal across recipes, equipment or line conditions.
The Gauge Stress Signal Map converts this principle into an observation sequence. It isn’t a setpoint card. Because the same symptom can be caused by many different things, use this card to identify what to verify before moving a gap or adjusting several variables at once.
| Signal at the sheet | What to preserve as evidence | First verification question |
|---|---|---|
| Uneven edges | Location, timing, side of the sheet and recent intervention | Did the condition appear before or after a specific reduction? |
| Holes or tearing | Sheet appearance, dough state and transfer point | Is the dough response stable enough for this reduction? |
| Elastic recoil | Change after relaxation and before cutting | Has stress had a documented opportunity to relax? |
| Sticking | Surface condition, location and product/line context | Is this a local transfer issue or part of a wider sheet change? |
| Thickness variation | Method, sample location and time | Is the variation repeatable under the same measurement method? |
| Unstable cutter entry | Registration, sheet stretch and final-gauge observations | Did the sheet change before it reached the cutter? |
Signed bakery technical coverage describes stepwise reduction as one of the ways to limit stress, but its cracker-context guidance shouldn’t be copied to a hard-biscuit recipe as a rigid rule. Record which roller preceded the signal and use a precise, repeatable measurement method. A defensible record is more useful than a copied ratio: what the sheet looked like, where it changed and what single intervention followed.
Key takeaway: Treat each gauge change as a conditional release: observe the sheet, preserve the context, then make one controlled adjustment if evidence calls for it.
Rotary Cutting: Surface Evidence and Scrap-Return Feedback
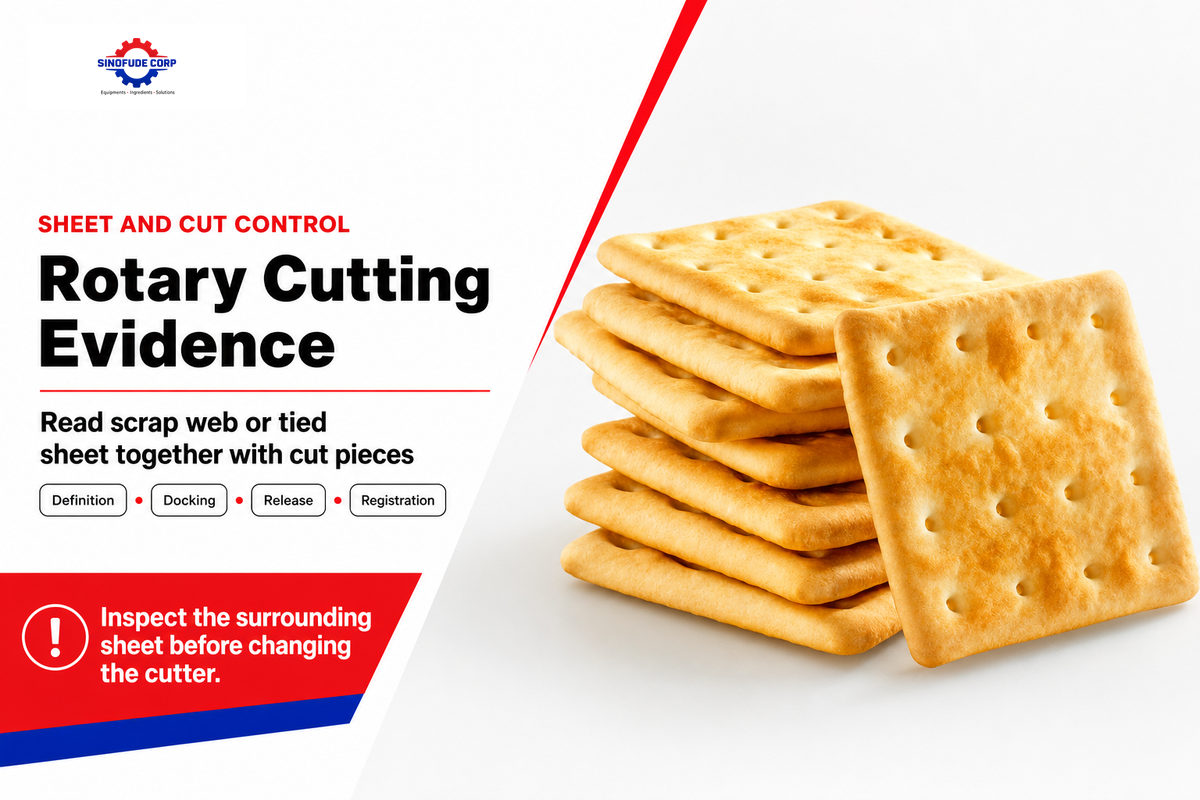
A scrap-cutter section shows consistent cut definition, docking, release, transfer and a continuous scrap web; with a tied cutter, inspect the interlocked sheet and edge trim instead. The surrounding web can show stretch, accumulation or release changes before a piece-level defect becomes obvious.
Inspect a defined sample location and time window rather than relying on an occasional visual pass. Compare the cut edge and docking appearance with registration, transfer behavior and trim continuity. When cutters emboss or print a surface, keep that observation with the same registration record. If a short strip of scrap follows a visible stretch after the final gauge, preserve evidence of the upstream sheet before adjusting the setting of the cutter.
- Be specific when describing docking and cut quality; don’t simply say “good” or “bad.”
- When a sheet-level issue occurs, mark the evidence as context and separate a one-point transfer issue from a recurring sheet-wide change.
- Keep transfer issues specific to a defined location.
- Change one controlled variable at a time and mark the event in the record.
Product-specific trim percentages and scrap limits are intentionally absent. They’re specific to the product and the process and no reviewed source supports transferring a single figure as a universal case.
Key takeaway: Where a scrap cutter is used, inspect the scrap web and cut pieces as one evidence system; with a tied cutter, inspect the interlocked sheet and edge trim.
Bake by Zone Purpose, Not One Oven Temperature
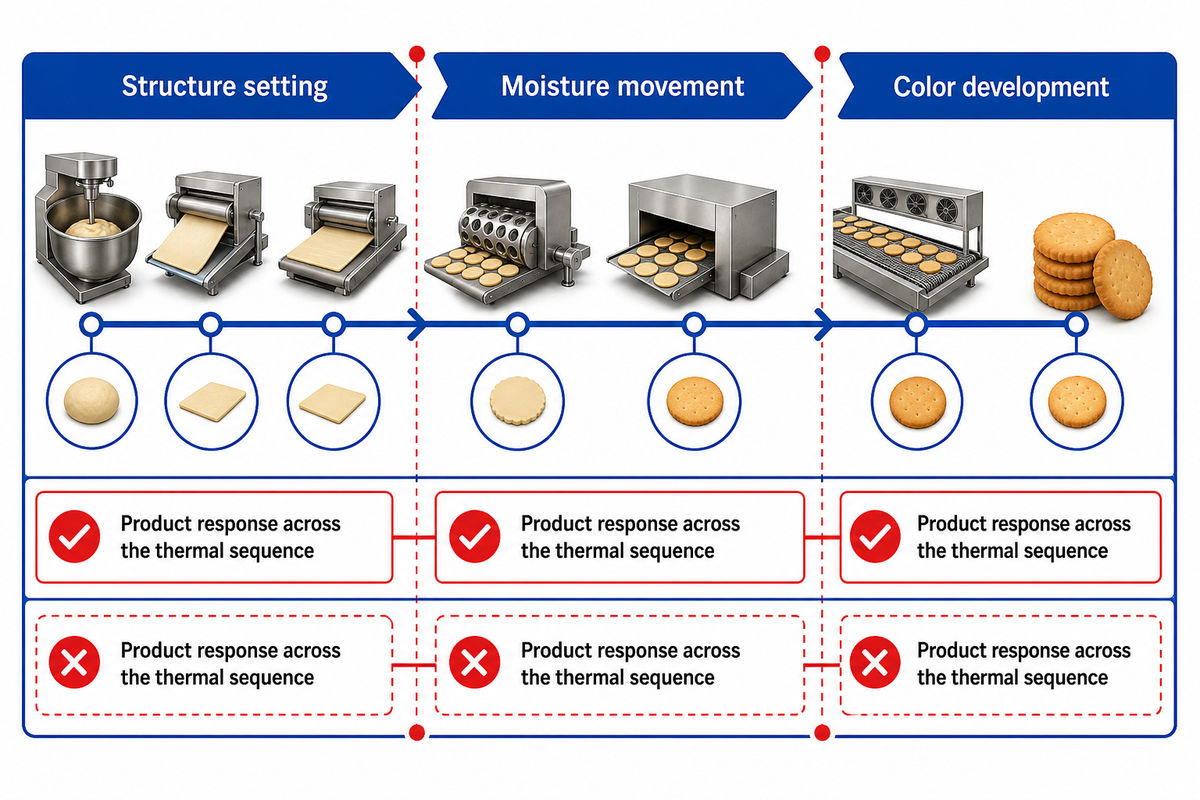
A multi-zone bake should be managed by the product response needed in each zone, not by one copied oven temperature. Baking involves radiation, convection, conduction, product-water phase change and drying; in the cited continuous indirect gas-fired oven study, conveyor speed, heat supplied above and below the product, and exhaust rate were principal control points.
Use the zone sequence to ask what is being achieved: early structure setting, moisture movement and final color development are useful purposes to observe. The presence of temperature control across a tunnel doesn’t mean uniform temperature at every position of the product. Likewise, an American Society of Baking discussion of multi-zone ovens supports flexibility and complexity, not a single correct profile.
| Zone purpose to review | Product evidence to document | What not to assume |
|---|---|---|
| Structure setting | Product shape, surface condition and response at the observed point | That one displayed temperature proves structure is correct |
| Moisture movement | Sampling method, location, product temperature and timing | That moisture content and water activity are interchangeable |
| Color development | Color pattern alongside loading and upstream evidence | That color alone proves physical quality or safety completion |
Appearance and physical measurements don’t validate the closure of a site’s food safety plan or a review of process contaminants. A visually acceptable bake cannot by itself close a site’s hazard analysis or process-contaminant review; any applicable limits, monitoring plans and corrective actions are product-, market- and site-specific.
Key takeaway: Record how the product responds across the thermal sequence; do not reduce a multi-variable bake to one universal temperature.
Cooling Is a Release Step, Not Empty Conveyor Time
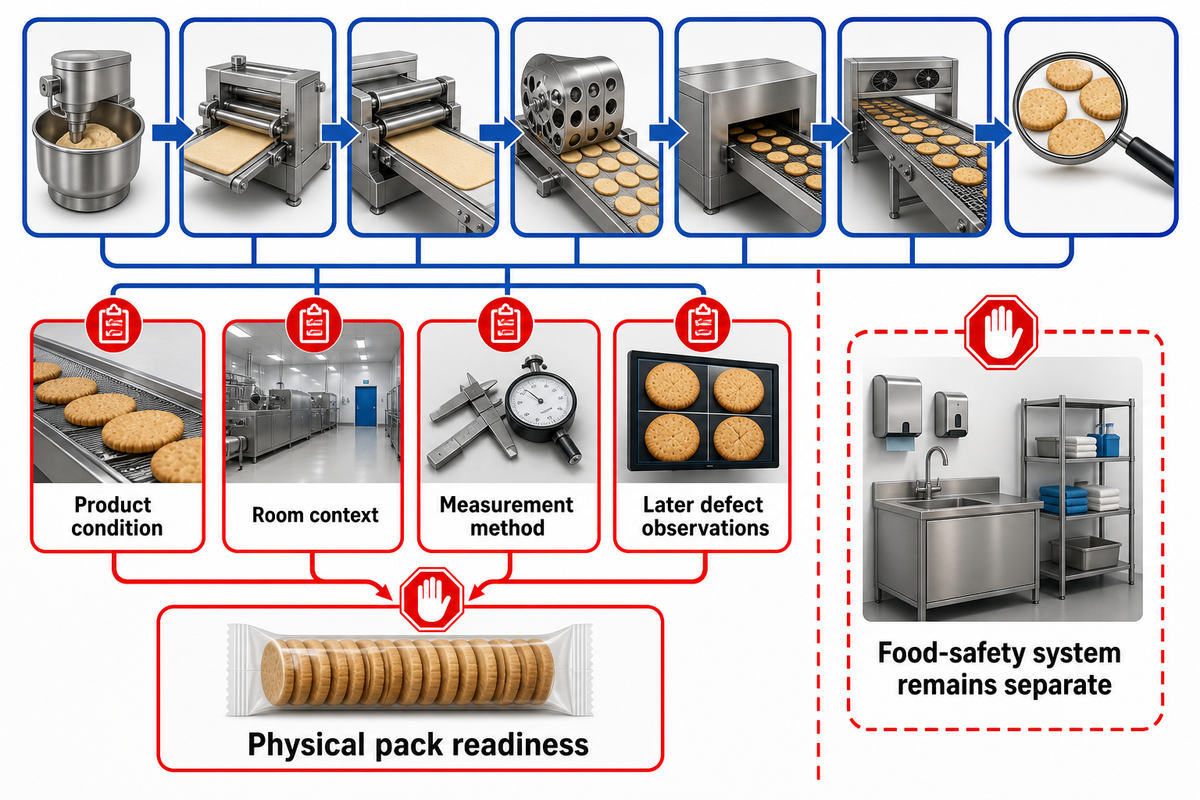
Cooling is an active release step, as internal moisture redistribution and stress can continue after oven exit. A biscuit that feels cool or appears intact may still require evidence of physical stability before stacking and wrapping.
Measuring moisture or water activity requires documenting product temperature, sample location, method and time. Record the sample’s location upon leaving the cooling conveyor and when it entered the food-contact packing step. FDA guidance distinguishes water activity from moisture content and notes that temperature differences can affect the measurement context. A number without context is weak evidence for comparison.
Reviewed checking research on a specific low-fat formula illustrates why this matters: delayed cracking was associated with a moisture gradient under the study’s own conditions. The result is evidence for keeping cooling and storage in the investigation, not a production target or a prediction for another biscuit.
Release boundary: physical pack readiness is not complete hygienic release. Sanitation, allergen management, environmental monitoring and microbiological decisions remain under the site’s food-safety system.
The key takeaway: cooling evidence must connect product condition, room context, measurement method and later defect observations before a packaging handoff is judged stable.
Defect Diagnosis: Start with Evidence, Not Settings
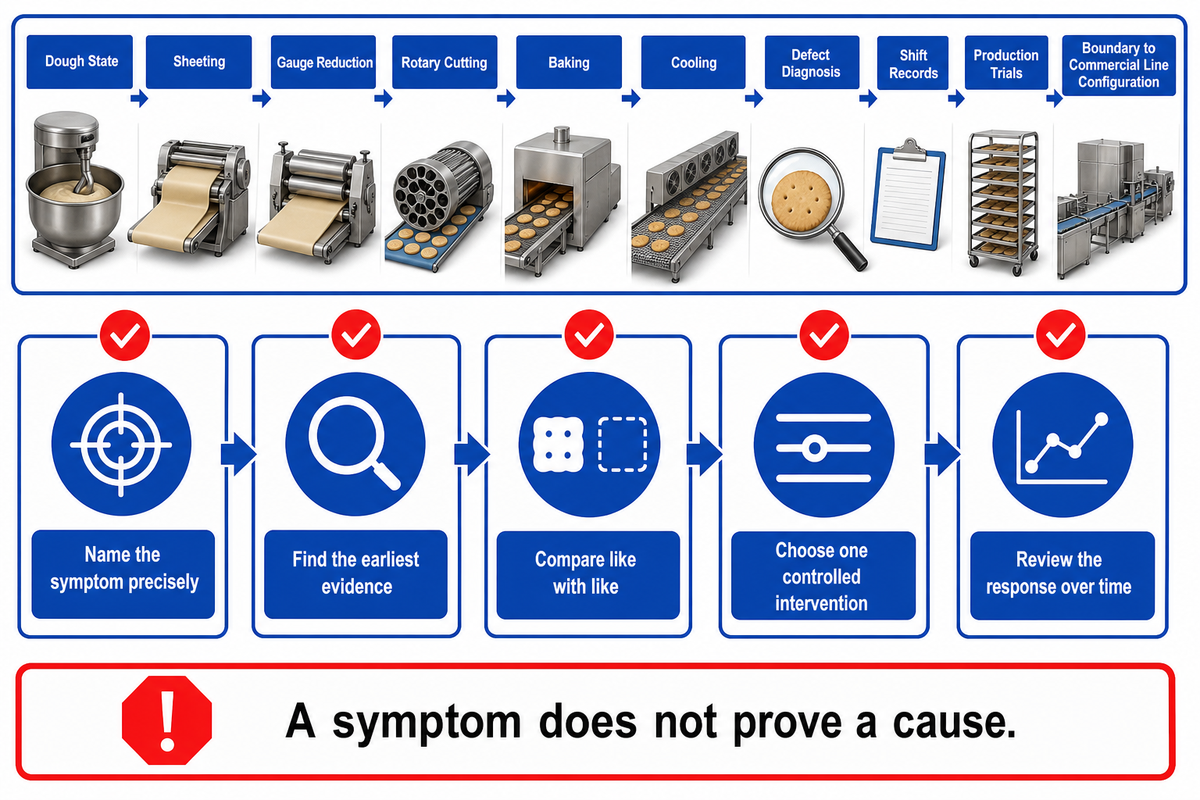
Defect diagnosis is initiated by finding the first observed change, and preserving that context before conditions are changed. Symptoms include, but aren’t limited to, blistering, checking, distortion, uneven color variation, and breakage. A symptom doesn’t prove a cause, so name the symptom precisely.
The Defect Backtrack Card gives a trial operator a short path to investigate a defect.
- Name a symptom precisely. Capture the time and location of occurrence, the method of measurement and the degree of severity.
- Find the earliest piece of evidence. Check the dough, sheets, cuts, oven, cooling and transfer records in that order rather than starting from the last observed defect.
- Compare like with like. Keep recipe, lot, line condition, run duration and measurement method visible in the comparison.
- Choose one controlled intervention. Record the event, the reason and the expected observation before changing anything else.
- Review the response over time. Make the necessary observations during cooling and storage to assess when the defect occurs after oven exit.
| Observed symptom | Evidence to backtrack | Boundary for interpretation |
|---|---|---|
| Checking cracks | Time to appearance, moisture/temperature method, geometry, cooling and earlier forming/bake history | Do not assign one cause from an oven-exit appearance |
| Distortion or poor registration | Sheet stress, final-gauge condition, cutter entry and transfer | Do not treat cutter adjustment as the automatic first fix |
| Uneven color | Loading, zone observations, product response and sampling pattern | Do not use color as a complete safety or quality release |
| Breakage | Stage-specific count, transfer point, cooling state and handling event | Vendor guidance can inform a check, not establish a universal limit |
Automation can capture data, but data capture alone does not establish that two samples are comparable; retain recipe, lot, line condition, run duration and method context. Plant-specific SPC examples show how Pareto, cause-and-effect and control charts are organized, but their defect rankings can’t be considered as an industry standard. The card is a method of collecting evidence in the presence of uncertainty.
Key takeaway: Compare conditions fairly when making changes and test one change at a time; rapid, multiple changes to different conditions make it difficult to collect the evidence needed to determine a defect.
The Shift Record That Makes Drift Diagnosable
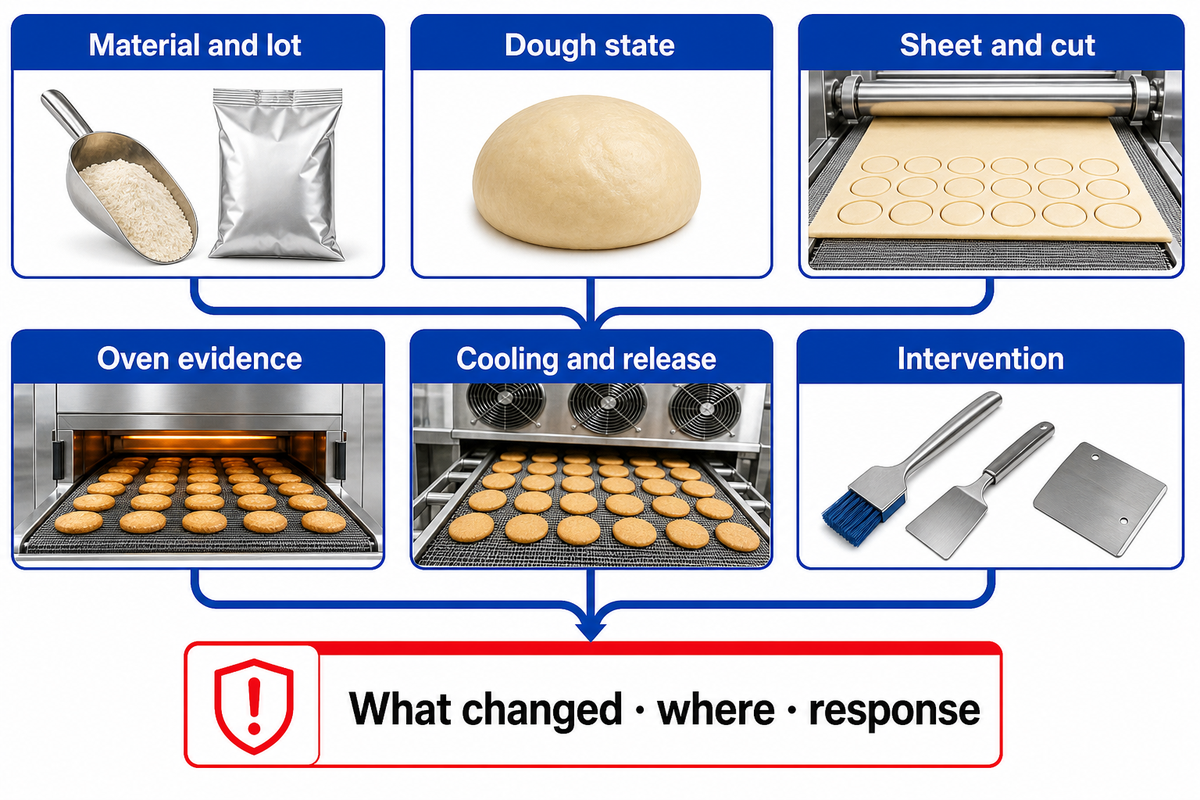
A useful shift record shows what changed, where it changed, and how the product responded. A dashboard isn’t enough if it loses material identity, sampling location, method, timing or the operator intervention that occurred between two values.
Use the 6-State Biscuit Control Framework as a shift-level forensic record, not as a replacement for the site’s required preventive-control records. Current food regulations support monitoring, corrective actions, verification and records where applicable; they do not prescribe this article’s biscuit-specific fields.
| Ledger field | Minimum comparison context |
|---|---|
| Material and lot | Ingredient identity, lot, recipe/version and relevant change |
| Dough state | Mix/rest event, observed response and method context |
| Sheet and cut | Location, edge/recoil/release evidence and registration |
| Oven evidence | Observed zone purpose, loading and finished response |
| Cooling and release | Product/room context, method and inspection timing |
| Intervention | Timestamp, reason, single change and observed result |
Connected data, alerts and traceability are relevant bakery technology themes; linked contextual records can support investigation and control decisions but do not by themselves prove savings, faster response or less downtime. However, a record is valuable only if one can determine the context of the material state and how it was observed. Only then is it possible to reconstruct a problem, and with that, possibly respond and coordinate faster, without guaranteeing less downtime.
The key takeaway is that a record is diagnostic if it captures the links among material, location, timing, method and intervention—not if it simply contains more numbers.
What a Production Trial Must Record
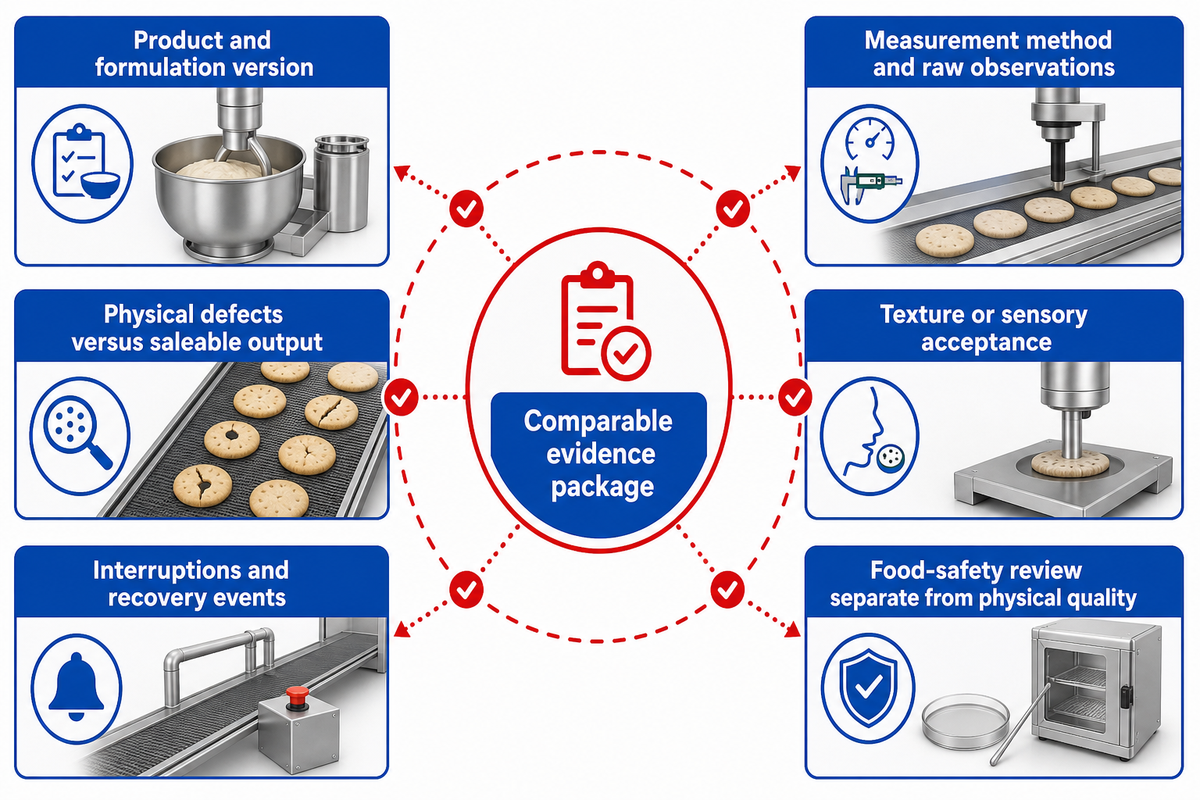
Production trials should provide a comparable evidence package, not just a good sample or a rated-speed statement. The record should capture the conditions that were tested, observations made, interruptions and recoveries, the context of the method, and outcomes of acceptance that demonstrate how the result was produced.
Start by separating gross output from the site’s defined saleable output and written product requirements. Keep recipe and ingredient context, line and run-duration context, sampling plan, defect observations, cooling and packaging handoff observations, and exceptions. Record downtime or a start/stop event rather than averaging it away.
- Define the product, formulation version, ingredient lots and relevant handling conditions.
- Record measurement method and instrument context, sample location and time with raw observations.
- Separate physical defect observations from the site’s saleable output.
- Include texture or sensory acceptance alongside defect rate, because a one-metric improvement can create an unacceptable trade-off under the tested conditions.
- Keep interruptions, recovery events, corrections and unplanned changes visible.
- Keep site-defined food-safety and process-contaminant review separate from physical-quality review.
A trial record is a guide, not a rule. Its specification should identify which conditions may vary flexibly and which acceptance points must stay fixed. Public biscuit studies highlight the importance of reproducible method context, but their mixer, gap, oven, timing and test settings are tailored to a specific formula and setup. A separate project input checklist can help keep commercial inputs distinct from this process evidence.
A trial record focuses on safeguarding tested conditions, measurement context, exceptions and acceptance outcomes.
Decision Framework: Compare Evidence, Then Move to Line Configuration
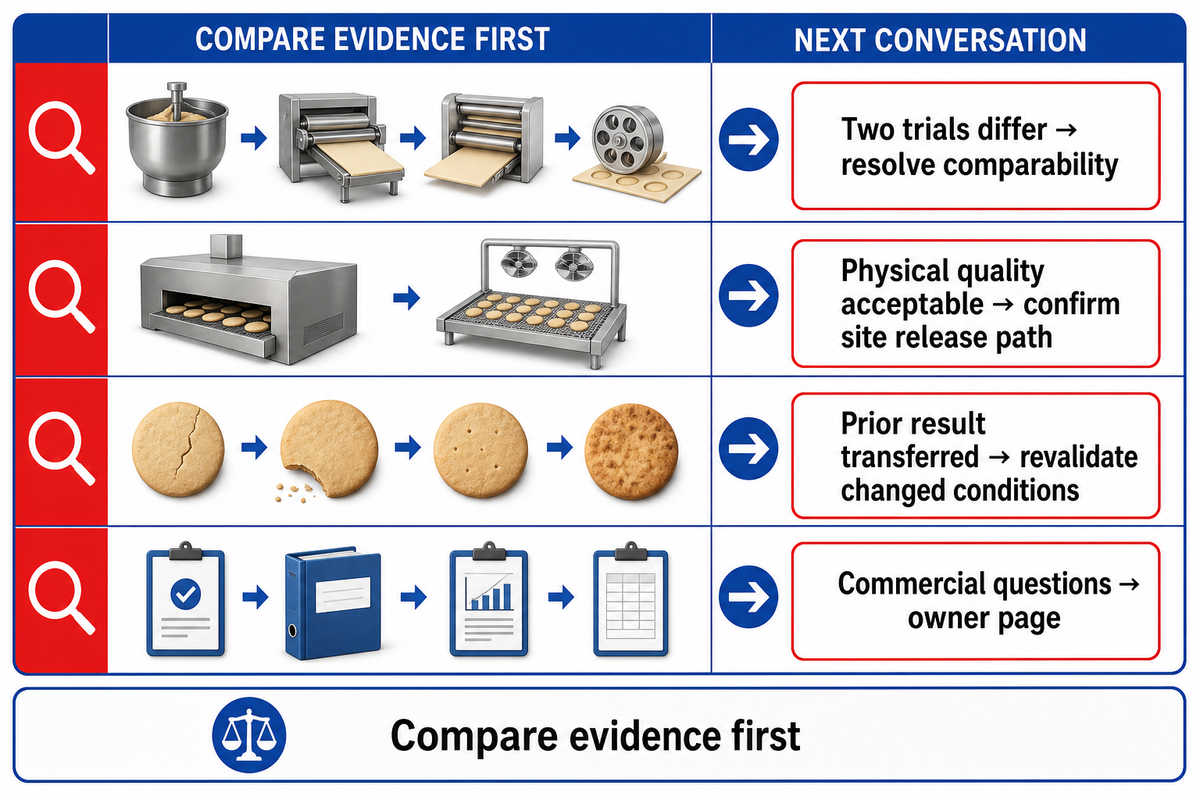
Move to a commercial discussion only after the evidence package is comparable, and the remaining question is about a configured solution. The phrase “automatic hard biscuit production line” is a configuration class, not evidence that a process result will transfer. This avoids making model, capacity, or quotation decisions to compensate for missing trial, quality, or run-context evidence.
| Decision situation | Evidence to compare first | Next conversation |
|---|---|---|
| Two trials appear different | Recipe, lot, measurement method, run duration, interruptions and saleable-output definition | Resolve comparability before treating either result as a baseline |
| Physical quality is acceptable | Cooling/handling evidence plus site food-safety and process-contaminant review boundary | Confirm the site-defined release path is complete |
| Prior result is being transferred | Equipment, line architecture, ingredient supply and run-duration changes | Revalidate under changed conditions before assuming carryover |
| Commercial solution questions remain | Decision-ready evidence package and project requirements | Move configuration, capacity, utility, quotation and RFQ discussion to the owner page |
After the evidence comparison, the decisions for model, capacity, utility, configuration, quotation and RFQ belong with the Hard Biscuit Line solution. When ownership at upstream and downstream handoffs is unclear, use the interface boundary planner as a separate scoping aid.
Bring a defined process question and its trial evidence to the next discussion.
Transfer of a prior result may no longer be valid with changes in equipment, line architecture, ingredient supply, or run duration. Revalidation is warranted under changed conditions; it isn’t evidence the prior result failed.
Key takeaway: Compare evidence first, revalidate when context changes, then use the commercial owner page for configured line decisions.
Frequently Asked Questions
These answers summarize the process control boundary of this guide, and don’t replace site-specific validation, a food-safety plan, or a configured equipment review.
What is a hard biscuit production line?
In this guide, a common industrial sheeted hard-biscuit route takes dough through preparation, sheeting, gauge reduction, rotary cutting, baking, cooling and packaging handoffs. This guide explains the observable product-state changes between those stages; it does not specify a universal configuration or commercial proposal.
What is the difference between a hard biscuit line and a soft biscuit line?
The key difference is dough behavior and forming route. Hard or semi-sweet biscuits are commonly discussed through continuous sheeting and cutting, while softer or shorter doughs may take another forming route. The label alone isn’t enough to select a model.
What is a tunnel oven?
A tunnel oven is a continuous oven through which products travel while heat-transfer and drying conditions change across zones. Its useful process description combines zone purpose, residence time, loading and product response rather than relying on one displayed baking temperature.
What factors should be checked before purchasing a biscuit production line?
First, determine whether your trial evidence is comparable: preserve recipe and lot context, raw measurements and methods, gross versus saleable output, physical and sensory acceptance, interruptions, recovery, cooling/packaging handoff and site-defined food-safety review. When your trial evidence is ready, you can address configuration, capacity, utility and quotation questions via the commercial owner page.
What causes checking cracks after biscuits leave the oven?
Checking is a symptom made up of interacting moisture, thermal, structural, and cooling contributors, and can happen after oven exit. Backtrack from the time of appearance, measurement context, cooling and upstream history instead of assigning a single cause from one visible crack.
Key takeaway: The most useful answer is usually an evidence path: define the product state, retain the method context and avoid treating a general guide as a recipe or release program.
References & Sources
These reviewed sources support mechanism, measurement context or governance boundaries. They don’t supply universal hard-biscuit settings, performance promises or a complete site release program.
- Peer-reviewed biscuit-dough study (PMC) formulation-dependent dough and texture context.
- Peer-reviewed cooling and checking study (PMC) study-specific evidence on delayed checking and moisture redistribution.
- CABI Digital Library review checking and biscuit-quality background.
- Food Chemistry cooling/checking research article biscuit-processing research context; Journal of Food Engineering continuous-baking model heat-and-mass-transfer context.
- Baking Business: Cracker tech 101 qualified technical context for progressive reduction, cutting and trim return.
- Baking Business: product-journey data article linked process-data context.
- eCFR: 21 CFR Part 117 and FDA preventive-controls summary general monitoring, verification, corrective-action and records boundary.
- Biscuit SPC case study plant-specific method example, not an industry defect ranking.